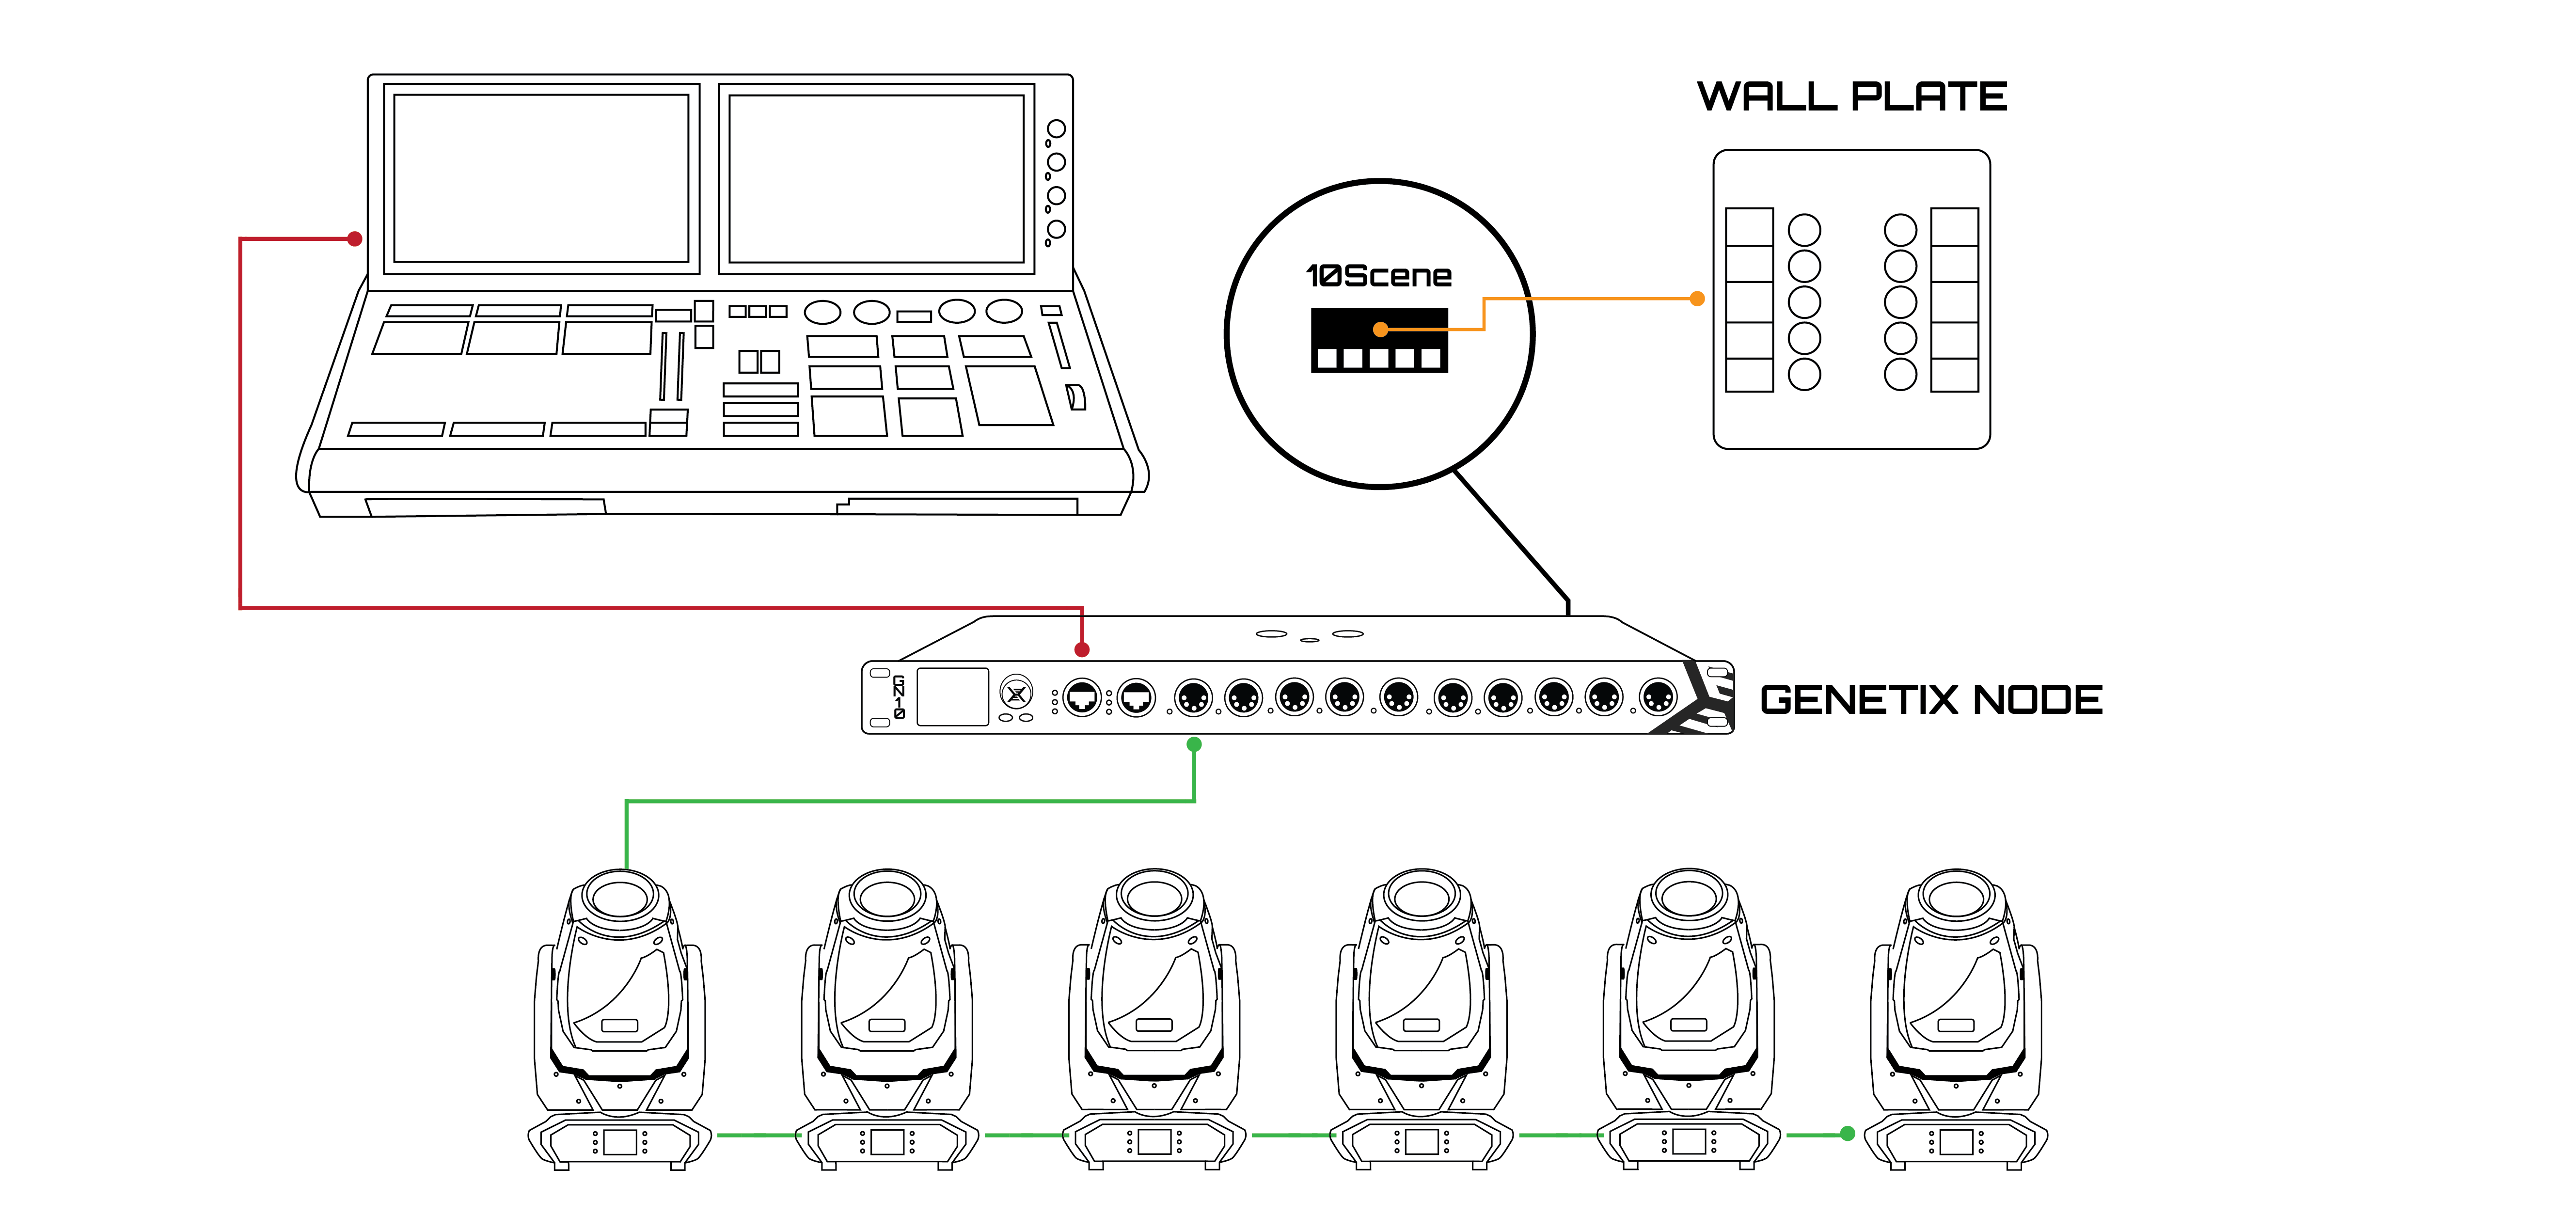
10Scene
The GN5, GN10, GN10R and GN10P 10Scene port can be used in the following configurations:
-
None
-
Scenes Optional (Default)
-
Only Scenes
-
User Configs
-
Gateway
When set to Scenes Optional scenes can be activated and deactivated as required, when no 10Scene buttons are active the GeNetix node operates normally with DMX control from a console.
When set to Only Scenes it operates like a 10Scene Store - One Scene must always be active and DMX control from a console is not supported. This is designed for installs where there is no console.
When set to User Configs, pressing the 10Scene button loads configuration 1 to 10 depending on the button pressed.
When set to Gateway the 10Scene of the Node (GN5, GN10, GN10R and GN10P only) functions like a 10Scene Gateway. From MagicQ/QuickQ it is interchangeable with a 10Scene Gateway.
This setting also controls the behaviour of 10Scene external triggers, so it is visible on all GeNetix nodes regardless of whether they have a physical 10Scene port.
10Scene External Control
The Scenes on the GeNetix nodes can be controlled via external protocols. The options are
-
None
-
10Scene App
-
MIDI notes 0..9
-
ChamSys Remote Ethernet Protocol (CREP)
-
DMX Input
-
DMX Output
GeNetix only supports one Zone ID. The Zone ID supported is determined by the ChamNet ID of the GeNetix device. By default the ChamNet ID is 0 (Def) and the GeNetix will respond to 10Scene Zone 1. When the ChamNet ID is non zero then the Zone ID is the ChamNet ID.
The 10Scene App shows the names and state of the 10Scenes programmed in the GeNetix and enables Scenes to be selected. When the GeNetix node Lock Mode is set to Lock All Devices, then the PIN number of the GeNetix must be entered on the 10Scene App.
MIDI is only available on the GN5, GN10, GN10R and GN10P. To control a Scene send MIDI Note On for notes 0 to 9 with velocity greater than 0.
GeNetix supports the X command from ChamSys Remote Ethernet Protocol. GeNetix supports CREP with or without a header on UDP port 6553. GeNetix accepts both x and X.
| Command | Function |
|---|---|
<button id> , <state> X |
10Scene zone 1 button with state |
<zone id> , <button id> , <state> X |
10Scene zone button with state |
The 10Scene mode determines the action taken. Note that when the 10Scene mode is set to Gateway, then controlling of Scenes from the 10Scene App is not possible.
If state is not specified, then a button press and release is processed. Where state is specified, then it has the following functions:
| State | Function |
|---|---|
0 |
Button release (this causes the Scene changes) |
1 |
Button press |
2 |
Activate Scene |
3 |
Release Scene (not supported if 10Scene mode is set to Only Scenes) |
4 |
Toggle Scene |
For example to activate Scene 2 send 2,2X.
The DMX Input and Output options allow users to activate Scenes via DMX, The DMX value determines the button as follows:
| DMX Value | 10Scene Button |
|---|---|
0-9 |
No Scene Active |
10-19 |
Scene 1 |
20-29 |
Scene 2 |
30-39 |
Scene 3 |
40-49 |
Scene 4 |
50-59 |
Scene 5 |
60-69 |
Scene 6 |
70-79 |
Scene 7 |
80-89 |
Scene 8 |
90-99 |
Scene 9 |
100-255 |
Scene 10 |
10Scene Programming Mode
10Scene programming mode allows users to program new Scenes onto the GeNetix node from MagicQ PC/MagicQ/QuickQ. To enable programming mode, navigate to Setup, Net Manager and select the Options tab. Select 10Scene Programming Mode and set to enabled.
When in programming mode, holding one button on a 10Scene Wall Plate or 10Scene Contact for 5 seconds will cause MagicQ PC/MagicQ/QuickQ to record the current programming to that scene, the Scene is succesfully programmed when the Plate flashes blue after which the user will release the 10Scene button.
10Scene programming mode is only supported on GeNetix Nodes with 10Scene ports such as the GN5, GN10, GN10R and GN10P.
10Scene Priority
The 10Scene priority setting determines how 10Scene Wall Plates/10Scene Contact interacts when DMX input is seen. The options are:
| Option | Function |
|---|---|
0 |
Above Input (DMX input is overridden by 10Scene) |
1 |
Below Input (10Scene is overridden by DMX input) |
By default the 10Scene priority is set to Above Input. When enabled 10Scene data will override all other sources of received data. This means that if a 10Scene button is pressed, the Scene will be activated and its Scene output, however no other source of data will be outputted until the Scene is deactivated.
When set to Below Input, received data will override the 10Scene data. This means that if a 10Scene button is pressed, the Scene will be activated, but will not be output until there is no other source of data. In this state the active Scene on the connected 10Scene Wall Plate will flash red.
10Scene Priority is only supported on GeNetix Nodes with 10Scene ports such as the GN5, GN10, GN10R and GN10P.
Q-Sys Plugins
ChamSys provides plugins for QSC Q-Sys that utilise the ChamSys Remote Ethernet Protocol.
For the Q-Sys plugin to control a GeNetix node the nodes 10Scene External Control option must be set to ChamSys Remote Ethernet Protocol (CREP).
To set this on a GeNetix Node use the front panel display and navigate to System, 10Scene External Control and pick CREP. This option can also be set via the Web Interface or through MagicQ PC/MagicQ by navigating to Setup, Net Manager and selecting the Options tab where the option can be set.
The ChamSys GeNetix plugin supports the triggering of 10Scene buttons from Q-Sys.
The Q-Sys plugins functions via UDP messages and as such is only supported on the GN5, GN10, GN10R and GN10P.